
User review of Dwarf 2 and Dwarf 3 by Sally Russell. An edited version appears in Popular Astronomy for September 2025
This review of the Dwarf 2 and 3 smart telescopes is written from the point of view of a primarily visual observer unexpectedly, but happily, discovering the lure of astrophotography!
At the time I developed an interest in astronomy, telescopes were exorbitantly expensive and difficult to acquire, so I followed the amateur telescope making (ATM) route and built a six-inch F8 Newtonian reflector. This home brew telescope gave me a great start to my visual observing and sketching journey. In the intervening years I’ve always resisted pursuing the astrophotography pathway even though the instruments I now use would enable this option. This is partly due to my overriding interest in visual and sketching pursuits, but also because of the necessary learning curve and potentially large financial outlay for astrophotography kit that I wasn’t sure I’d use sufficiently to justify the cost. Thus, I was sceptical of the potential of the Dwarf 2 smart telescope, certainly in relation to my areas of interest, when it was initially brought to my attention. However, once I had seen the images that it could produce, in particular a 10-minute capture of the region encompassing the visually difficult dark nebula “Barnard’s E” (B-142 & 143), I decided to take the plunge and buy one. My image was taken some months later (150 x 15 sec, gain 80, IR pass).

The Dwarf 2 is a very compact piece of kit, roughly the size of a thick paperback book and therefore extremely portable. Of all the smart scopes on offer at the time, it was this portability which particularly attracted me, as the scope plus accessories fit into a custom padded bag smaller than a standard loaf of bread. The price was also very competitive, being less than the cost of many single, premium eyepieces. Control of the device is via a smartphone (or tablet) using the DWARFLAB app. The app is constantly evolving, so there have been several significant software and firmware updates in the time that I’ve been a user. Many of the improvements apply to both the Dwarf 2 and the newer Dwarf 3, with a few being specific to the Dwarf 3 only.
The Astro function of the Dwarf 2 uses a 24mm aperture telephoto lens giving a 1.8° x 3.2° field in a pleasing landscape format. I should admit here that I really like wide field visual views where astro targets can be seen in context, so this field size ticked that box for me. Both the telephoto lens and the Dwarf 2’s other lens, a 2.8mm aperture wide field lens giving an approx. 50° wide view, can be used for normal photo and video purposes, but I’ll be concentrating on the Astro mode for this discussion. Even though a small tabletop tripod was supplied with the Dwarf 2 it is better to use a more robust photographic tripod as a minimum to give improved stability.
Using the Dwarf 2 to take deep sky targets has been something of a revelation! It is incredibly easy, which is great for someone like me with essentially no prior astrophotography experience aside from having occasionally taken a few prime focus DSLR shots. There’s a host of information on the DWARFLAB website, plus many YouTube videos, describing how to get started, and it really is a quite straightforward process. I did, however, also have the benefit of being party to the experiences of other astronomers who were ahead of me on the Dwarf 2 learning curve, so that did help me get up and running very quickly.
Before attempting any deep sky imaging, it is necessary to take some astro darks, covered by one of the “Function” options. With the telephoto view on the live screen, clicking the “Darks” icon opens a dialogue box listing the required steps. These darks are stored on the SD card and are used to aid the processing of the final images.
I have chosen to use the Dwarf 2 in alt-az mode only, as there was much discussion on various astronomy boards of how the early units would often come apart at the base if they were set up in a polar aligned fashion. Polar aligning the unit does put additional strain on the alt-az “bearings”, so it is a personal call as to whether to try this. The later units are allegedly ok, being built with more robust bases, but clearly, I am risk averse! However, long imaging runs with the Dwarf 2 in alt-az mode can lead to big corner artefacts which need to be cropped from the final image, whereas the advantage of polar aligning the unit is that these artefacts are mostly eliminated.
When beginning a nighttime session in Astro mode, it is necessary to ensure that the stars are in focus. With the Dwarf 2 positioned so that it is level and aimed in the approximate direction of a bright star, manual rotation of the cylinder should bring the star onto the live screen. Clicking on the “Focus” icon opens a dialogue box where Autofocus can be selected, with further fine adjustments carried out by using the +/- buttons as required. The good news is that the Dwarf 2 remembers this focus point, so the next time you fire up the device it will already be at, or very near, focus.
The next step is to initiate “Calibration” (a one click menu option) where the Dwarf 2 does a sky search until it recognises where it is pointed. It is necessary to manually orient the cylinder so that the lenses are pointing upward, preferably above the local treeline/obstructions, before carrying out calibration. Once the Dwarf 2 has found its bearings, a target can easily be selected via the “Atlas” or search function and be put into the field of view via a one click “GOTO” function, which also initiates tracking of the object. This is when the image parameters can be set (shutter, gain, number of frames, built-in IR cut filter or IR pass), and then it’s time to press the red GO button. It takes far longer to write this process down than it does to carry it out – the Dwarf 2 can generally be gathering data within just a few minutes of being switched on.
The smartphone or tablet live screen pleasingly shows the image building as the frames are stacking, with the final image being stored in the Dwarf 2 “Album” ready for downloading. I’ve found that taking a screenshot before the imaging run finishes is useful, as this captures the dialogue box containing all the run information, such as Target (by name or number), Shutter, Gain, Total (number of frames set), Current (number of frames taken), and Stacked (number of frames stacked so far). It’s then available in your phone gallery as an aide memoire for manually adding this run info to the final downloaded image (which does not transfer with any embedded information). The info is available in a text file in the image folder, but it can only be accessed once the folder has been downloaded to a computer. Getting into the habit of downloading images as soon as they are available in the album is also helpful. They can’t be accessed while the device is switched off, and it’s so easy to get to the end of a session and shut everything down, then realise you’ve forgotten to download the images beforehand!
If a long imaging session is planned it is also beneficial to connect a suitable external power bank to the Dwarf 2 to ensure that you don’t run out of power at a critical moment, especially in cold conditions. If watching the image being stacked is not required, it’s possible to disconnect the phone (and go indoors!) while the imaging run is underway, but a second power bank might be needed for the phone if monitoring of the stacking is desired.
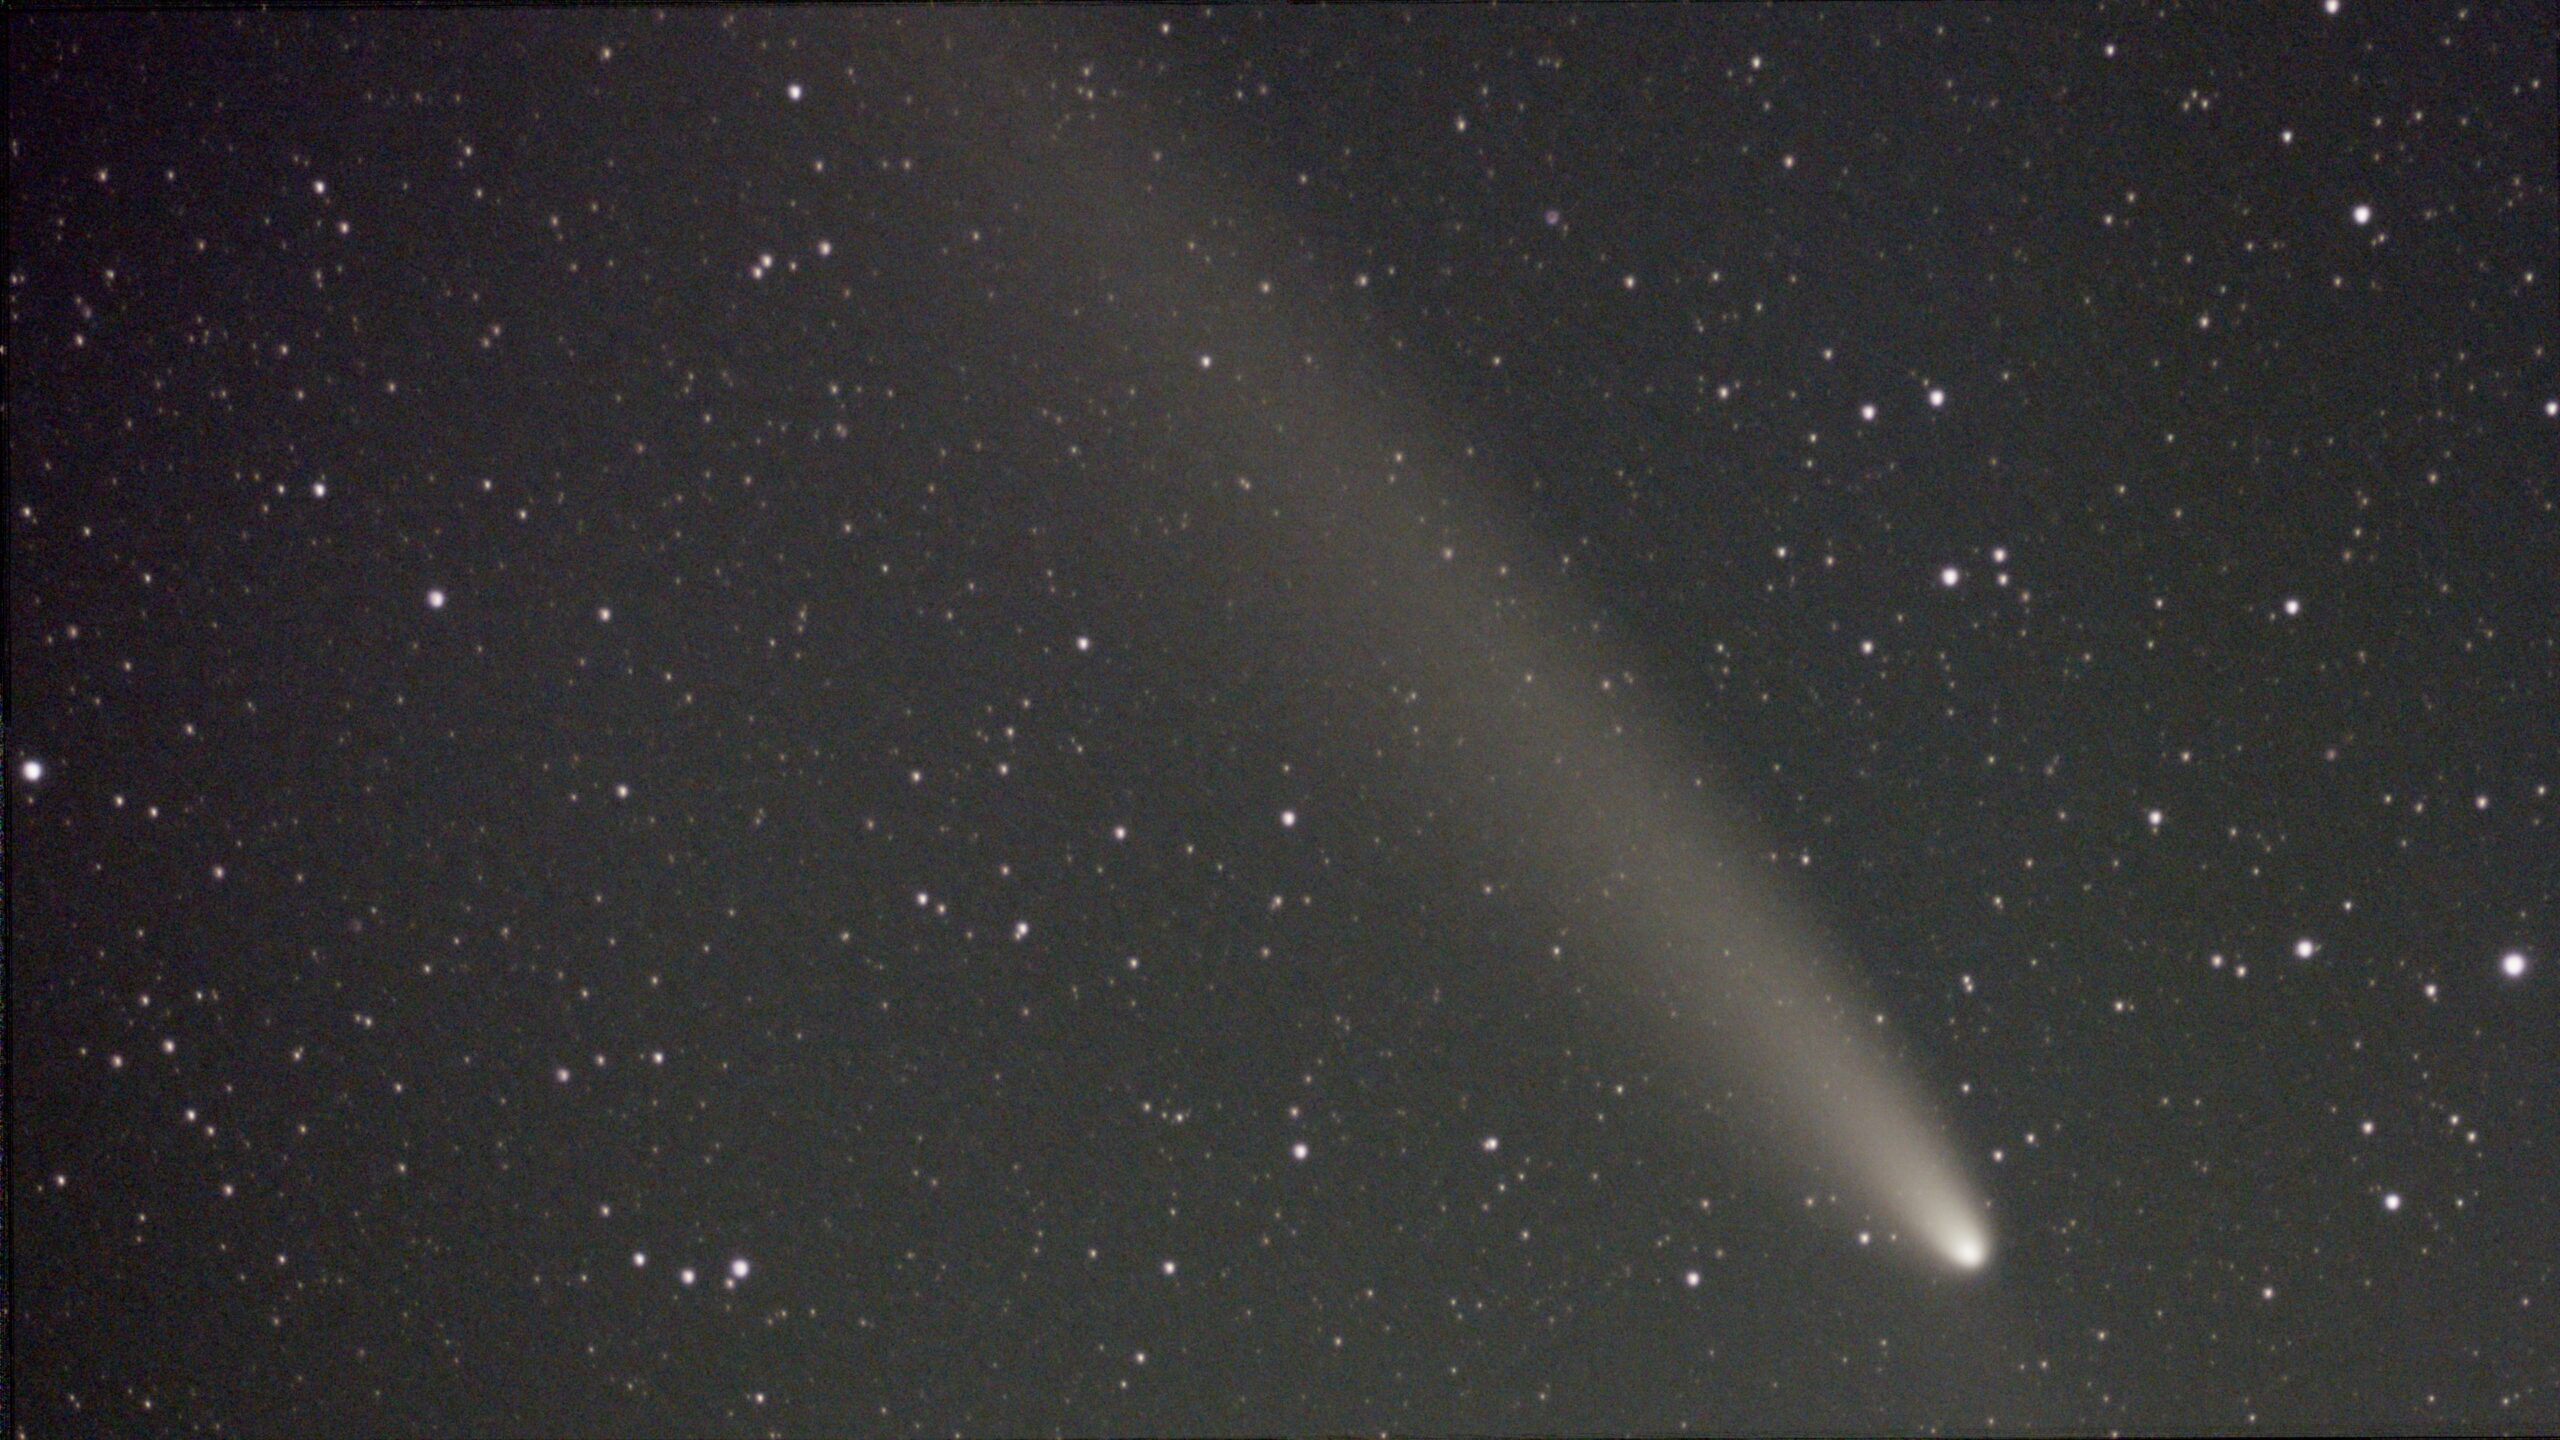
The Dwarf 2 is particularly good for imaging comets, which are often quite difficult targets visually. Their custom positional data (RA and Dec, from online ephemeris information) can be entered via the search function, and even just a few minutes of data gathering can give fantastic results, such as the image of Comet C2023 A3 Tsuchinshan-ATLAS, from 23 October 2024 (100 x 5 secs, gain 80, IR pass).
The fixed field of view of the telephoto lens is a great yardstick for demonstrating the relative angular size of the objects captured. How often have you seen beautiful astro photos of objects but wondered how big, or small, that object is? With the Dwarf 2 the Helix Nebula (NGC 7293), for instance, is captured as a colourful small doughnut in a large star field (60 x 10 sec, gain 80, IR pass, UHC filter), whereas the Rosette nebula (NGC 2237) only just fits into that same field in its entirety.


No matter what target is chosen, it is possible to increase the contrast of the final stacked image by using the “S” Curves adjustment icon on the app live screen and save this adjusted view directly to your phone gallery (it does not get saved into the Dwarf 2 Album along with the original stacked image). And a word of warning about the AI enhancement option, accessed from within the “Settings” menu. It is “On” by default but can be (often is!) a bit aggressive at processing out fine detail from your carefully captured stacked image, with no “revert” option. It is therefore worth getting into the habit of always checking “AI On/Off” as part of the process before commencing every imaging run.
When using the Dwarf 2 for solar and lunar imaging, the targets are manually put into the field of view by aiming the unit in the general direction of the Sun or Moon, then rotating the cylinder until the object becomes visible on the live screen. (Important – solar images must be taken through the supplied, 1,000,000-rated neutral density filters. These need to be fixed in place using the magnetic filter holder before trying to get the Sun on screen, to avoid damaging the sensor and lenses.) In slightly more detail – selecting the “Wide” option first gives a 50-degree live screen view with the corresponding “Tele” view represented by an outline rectangle in the middle. It is then a matter of using the onscreen “joystick” buttons to adjust the Sun or Moon into the middle of this rectangle, before selecting/toggling to the “Tele” option ready for the imaging run. Though solar and lunar photos can be taken using Photo mode, they will be a single frame by default, whereas if Astro mode is selected it is possible to stack frames in a similar fashion as for nighttime images, giving a higher resolution result.
Nicely detailed, monochrome solar white light images showing sunspots and faculae can be obtained, such as the image taken on 10th May 2024 showing the large sunspot group, AR3664, that gave rise to the strong auroral display later that night (25 x 1/125 sec, gain 0, IR cut). Short “daytime” exposure times (e.g. 1/60 – 1/200 sec) generally give the best results. A run of around 20-25 frames works well for solar shots, as this is sufficient to capture granulation in the final image while keeping the view crisp. If a much higher frame count is used there is a risk of the solar image becoming rather soft.

As with normal photography of the Moon, the exposures used when imaging with the Dwarf 2 depend on the lunar phase but are still in the usual “daytime” bracket, though much longer exposures of a few seconds are generally necessary when trying to catch earthshine. Again, just 20-25 frames are usually sufficient for a crisp but detailed lunar image. Once you get used to the process it is possible to set up and take solar or lunar images within just a few minutes. Taking a set of images with different exposure times gives the option to select the most favourable one to download.
Obviously, there are limitations with the Dwarf 2 given its diminutive size. For example, even though they are included in the target lists, it is not possible to capture any details on the planets as they are far too small and bright within the 3.2° field. The short exposure times possible for solar and lunar captures are now available for nighttime imaging (it was previously a minimum exposure time of 1 sec), which might help mitigate planetary brightness but still cannot compensate for their tiny angular size.
As is the case with any given aperture of scope, there is a limit to the resolution of the final image that can be achieved, but given the versatility of the overall package, personally I think the Dwarf 2 rates very highly for its size. Perhaps the major limitation is the inability to rotate the view to best frame the target, but one workaround for large DSOs is to try imaging at a different time of year! When I first tried to capture the California Nebula (NGC 1499) it landed at 90 degrees to the ideal orientation, whereas many months later I finally captured it lying perfectly along the length of the landscape view (80 x 10 secs, gain 80, IR pass, UHC filter).

There are other positives with this scope. Standard 1.25-inch filters can be used externally, so there are many options which can be explored besides the included built-in IR cut filter and external UHC filter. Plus, the image FITS files can be downloaded to a computer and manually re-processed to give enhanced images over those provided directly by the Dwarf 2, though I will admit to not having tried this myself yet. As an aside, it’s also a great tool for outreach, where the developing image can be shown live on screen, then shared via airdrop or email at the end of the session. And importantly, DWARFLAB are reliably prompt at responding to email queries, and are keen to offer solutions for any issues or problems.
Like many others who’ve acquired a smart scope, I quickly embarked on a journey capturing many and varied targets. It has been quite marvellous to discover that so many difficult visual targets have been very easily captured from my light polluted back garden under “so-so” skies, and even though there has been the inevitable trial and error learning curve discovering the best combination of exposure/gain/number of frames/filter (or not) to use, it has been, and still is, a rewarding and enjoyable journey. Clearly the Dwarf 2 cannot compete with the kind of results obtained from carefully constructed, larger aperture, high end astrophotography rigs where imaging runs can be over many hours, with similar time spent on image processing. However, for those who don’t have that kit or expertise, the Dwarf 2 provides an incredibly accessible way to obtain quite remarkable results from a 24mm aperture scope.
When the Dwarf 3 was announced with its purported substantial increase in capability, I was immediately interested. The larger aperture, bigger sensor (improved resolution), and in particular the possibility of being able to take wide field astro photos, to name a few, were very tempting prospects, especially given that this was all incorporated within an instrument of virtually the same size, and price, as the Dwarf 2. Given my very positive experience with the Dwarf 2, I eventually chose to expand my DWARFLAB journey by getting into the queue for a Dwarf 3.
Unfortunately, when the unit eventually arrived it was faulty. Frames simply would not stack, among other issues, and I couldn’t get a successful astro photo with it despite my previous long experience with the Dwarf 2. Obviously, this was tremendously disappointing, but I contacted the UK suppliers who were extremely helpful, and thankfully they managed to obtain a replacement for me relatively quickly which worked properly straight out of the box.
Most of what I’ve written so far in relation to using the Dwarf 2 essentially applies to the Dwarf 3. However, now that I’ve had time to put the Dwarf 3 through its paces for astro targets, there is no doubt that the enhanced features do make a significant difference to both the user experience and results. On a side note, the word is that the Dwarf 3 has been designed with much stronger alt-az bearings, so it can be polar aligned without concern using the “EQ” mode menu choice. This takes you through the steps to enable easy set up in this mode. Using a small equatorial wedge and levelling device between the Dwarf 3 and the tripod head, or a robust ball-head on the tripod, makes this a straightforward process. For nighttime shots with the Dwarf 3 I do now use EQ mode but prefer alt-az mode for solar and lunar imaging.
So, what are the major differences and how have they panned out? The aperture of the multi-element, ED glass Dwarf 3 telephoto lens is 35mm (versus 24mm for the Dwarf 2), so delivers a significant increase in light gathering with increased contrast in the resultant images, e.g. Galaxies M81 and 82 (130 x 15 secs, gain 60, Astro filter.) The resultant telephoto field size of the Dwarf 3 at 1.6° x 2.95° is only slightly smaller than that of the Dwarf 2 at 1.8° x 3.2°.

The Dwarf 3 has a “Mosaic” mode, where up to 2 x 2 of the standard telephoto field (giving a possible 3.32° x 5.9°) can be acquired. This can be accessed from within the Atlas, where clicking on the preview icon (positioned below the search icon) permits stretching of the preview box to the desired size before progressing with the imaging run as usual. Due to the dearth of sky darkness during the summer months I’ve not yet achieved proper results from this feature so I will reserve judgement, but its worth noting that if a mosaic area has been set the Dwarf 3 calculates the (rather large!) number of frames required and sets its own algorithm for imaging the area, regardless of any parameters entered. It’s probably a function best saved for the winter months when there are many hours of darkness for the run to complete.
The 3.4mm aperture, fixed focus Dwarf 3 wide field lens can be used in Astro mode (in contrast to the 2.8mm Dwarf 2 wide field lens which cannot), so this is a significant enhancement. Needless to say, a properly clear and dark sky is required to achieve decent wide field images, otherwise the view will be plagued by cloud smears and light pollution. In my experience, under suburban skies it’s best to stick with short exposures of 1-3 secs, whereas under darker skies exposure times can be much longer. I got lucky with the sky conditions at the spring Kelling Heath star party in north Norfolk in March this year and managed to bag some wide field views in EQ mode using the default Astro filter. The view of the Milky Way region running into Cygnus was taken over 25 minutes (100 x 15 secs, gain 60), whereas the Auriga region was taken over 45 minutes (180 x 15 secs, gain 60). The maximum exposure time possible is now 60 secs (in EQ mode) versus 15 secs for the Dwarf 2.


The darks process is slightly more complicated with a Dwarf 3, as separate sets of darks are needed to cover both the telephoto and wide field shooting options. In this case, with the telephoto view on the live screen, clicking the “Darks” icon opens a dialogue box listing the required steps, with an icon at bottom left on the screen confirming that “Tele” darks are being taken. Starting from the wide field view and following this procedure leads to “Wide” darks being taken. The Dwarf 3 darks are quite temperature specific, so replacing/refreshing them on a semi-regular basis depending on the temperature of the season can help to avoid ending up with blotchy background patterns which persist from image to image.
The Dwarf 3 now has internal filters, ensuring that they won’t dew up while in use, or get dusty, dirty or covered in thumbprints! The Visible, Astro and Dual Band filters can be selected as a simple parameter choice, with the Dual band filter being specific for use with the telephoto lens only, and the Astro filter being the default option with the wide field lens. The Rosette Nebula image was taken from my suburban back garden in EQ mode using the Dual Band filter, over 1 hr 40 mins (400 x 15 secs, gain 60).
Another noticeable change is with solar imaging, where the neutral density filters, now part of a fixed pair of magnetic “sunglasses”, are rated at 100,000, versus the 10x higher rating of 1,000,000 for the Dwarf 2 solar filters. This results in comparatively much shorter exposure times being required to avoid over-exposure (e.g. 1/800–1/1250), with the subsequent image being a light orange solar disk rather than the monochrome version obtained with the Dwarf 2.
Other changes include a higher capacity (10,000 mAh) built-in battery (with the identical external USB-C charging port), plus an embedded 128GB multi-media card (EMMC) instead of the rather fiddly removeable 64GB Micro SD card of the Dwarf 2.
One feature of the DWARFLAB app which applies to both Dwarf versions but which I have only recently trialled with the Dwarf 3, is the “Schedule” function. This allows the user to compile a list of targets to be run automatically, with just the calibration step being required beforehand once the scope is in position. The process of setting up the list is very intuitive. Other features which apply to both Dwarf versions, and which I am yet to try, are “Stellar Studio”, which enables image processing after having uploaded images to the DWARFLAB servers, and “Mega Stack”, where images can be combined from multiple sessions.
I have not yet ventured into the purely photographic options of the Dwarf 3, but in contrast to the Dwarf 2 it can take video, panorama, burst and timelapse options in wide field as well as in telephoto – another major enhancement. I would certainly test out some wide field photo options if we were lucky enough to get further auroral displays this solar cycle!
On a personal note, getting to grips with the Dwarf 2 and 3 smart scopes has been a game changer. I’ve now “seen” and captured my own version of so many objects that I never thought I would encounter – visualising the invisible, if you like! I also have better awareness of the location of so many more objects, plus have finally gotten properly to grips with RA and Dec whilst I’ve been poring over my star atlases searching for new targets to catch.
For me, the Dwarf 2 and 3 have been worthwhile investments, a great addition to my conventional astro kit, and quite transformative for my astronomy. As the Dwarf 2 has been out of production for a while now, the only option available is the more capable Dwarf 3. I don’t think you will be disappointed if you try one.
Sally Russell